Transcribe captcha images to text using convolutional neural networks.
CAPTCHA stands for Completely Automated Public Turing Test. It is a type of challenge-response test to determine whether the user is a human or an automated system in the computing world. The earliest form of CAPTCHA involved recognizing a sequence of letters or numbers from distorted text images. This is the captcha we will aim to recognize using neural networks today (a bit ironic!).
Turing tests have advanced over time and are generally described as a reverse turning test because it is administered by a computer.
This notebook uses convolutional neural networks to determine the characters in the given captcha. It can also serve as a base case implementation of recognizing text in images.
Implementation of the idea on cAInvas — here!
The dataset
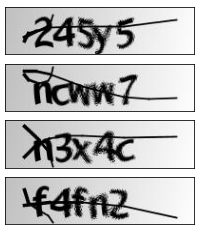
The dataset has 1070 captcha images, each with 5 characters and dimensions 50×200. The filename is of each image is its corresponding text.
Each character is either a lowercase alphabet or a digit, thus making the total count of possible characters 36 (26 letters + 10 digits).
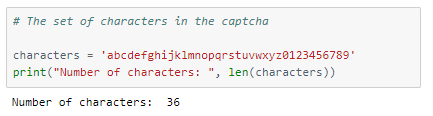
The ‘characters’ string will be used for recognizing the text later.
A peek into the dataset images —
Preprocessing
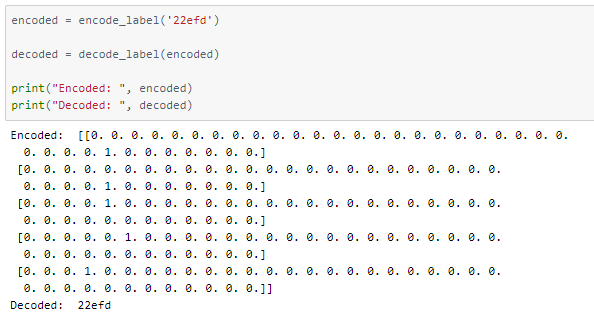
Labels encoding/decoding
Functions to one-hot encode and decode the output captcha characters are defined.
Defining the input and output to the model
The input X is the NumPy array representation of each image. The images have 4 channels which are reduced to 1 by converting the image to greyscale. They are then normalized so that every pixel has a value between 0 and 1. This helps in faster convergence of the model.
The output y has 5 arrays representing the five characters required as output. Each of these arrays has a one-hot encoded array of length 36 representing the ith (1 to 5) character for each input image.
The shape of the model’s input is (1, 50, 200, 1) and the output is (5, 36).
Train-test split
The dataset is split into train and test using a 90–10 ratio resulting in 4 arrays — two each (input X and output y) for train and test sets.
The train set has 963 images while the test set has 107 images.
The model
The model has 3 pairs of Conv2D — MaxPooling2D layers followed by BatchNormalization to re-center the values of the layer’s input. This is then followed by a Flatten layer to convert the multi-dimension input to 1D.
This is then followed by a Dense layer, a Dropout layer, and another Dense layer for each letter in the captcha output, arranged in parallel. That is, each of these first dense layers receives the same input from the flatten layer.
    output_layers = []
for _ in range(5):    # For all the 5 output characters
        dense1 = tf.keras.layers.Dense(32, activation=\'relu\')(flat)
        drop = tf.keras.layers.Dropout(0.6)(dense1)
        dense2 = tf.keras.layers.Dense(len(characters), activation=\'sigmoid\')(drop)
        output_layers.append(dense2)
    model = tf.keras.models.Model(input_layer, output_layers)
    model.compile(loss = \'categorical_crossentropy\', optimizer=\'adam\', metrics = [\'accuracy\'])
return model
model = create_model()
model.summary()

The model is compiled using categorical cross-entropy loss as the outputs are one-hot encoded. Adam optimizer is used with the default learning rate of 0.01and the accuracy of all the 5 final dense layers is tracked.
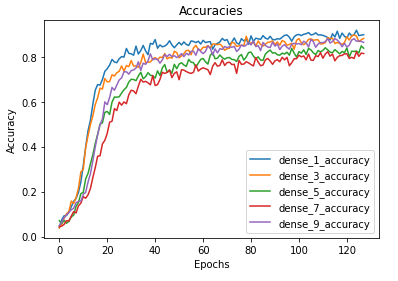
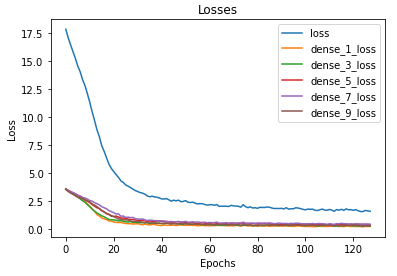
The model was trained for 128 epochs and was able to achieve accuracies as given —
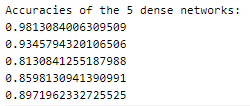
The metrics
Prediction
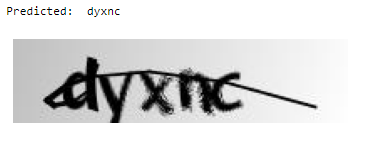
Let us look at a random image from the test dataset while the model predicts the text.
def predict(file):
    img = Image.open(file)
    img = ImageOps.grayscale(img)
    img = np.asarray(img)/255
    img = np.reshape(img, (1, img.shape[0], img.shape[1], 1))

    output = np.asarray(model.predict(img))
    output = output.squeeze()    # Remove empty dimensions
return decode_label(output)
#i = random.randint(1, total_samples) # Pick one from all the image samples
i = random.randint(train_count, total_samples) # Pick one from only the test set
filename = \'samples/\' + images_list[i]
plt.imshow(Image.open(filename))
plt.axis(\'off\')    # Removing the axes
print("Predicted: ", predict(filename))
deepC
deepC library, compiler, and inference framework are designed to enable and perform deep learning neural networks by focussing on features of small form-factor devices like micro-controllers, eFPGAs, CPUs, and other embedded devices like raspberry-pi, odroid, Arduino, SparkFun Edge, RISC-V, mobile phones, x86 and arm laptops among others.
Compiling the model using deepC —

Head over to the cAInvas platform (link to notebook given earlier) to run and generate your own .exe file!
Credits: Ayisha D
Also Read: Malicious URL Detection