
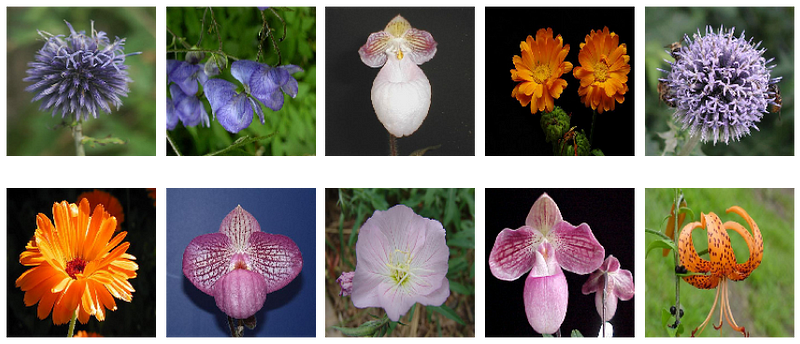
Classifying different types of flowers based on their images drawn from different datasets. Some classes are very narrow, containing only a particular sub-type of flower (e.g. pink primroses) while other classes contain many sub-types (e.g. wild roses).
Task
Classification of flowers is a difficult task because there are flowers that look almost the same and flowers that are the same but look different, mainly because of their colors. Consider a rose for the example, it comes in 3 different colors commonly. So, the model has to be perfect in predicting color as well as shape.
For our purpose, let’s build a flower classifier from scratch using Sequential API available in Keras-Tensorflow. Import the required libraries.
import pandas as pd
import numpy as np
import matplotlib.pyplot as plt
import csv
import imageio
import os, shutil
from tensorflow import keras
Dataset
You can download the flower dataset from here, it contains 102 types of different flowers. We will select the first 10 labels for the classification. Since data is already present inside the subfolders named as labels, you can use Flow-From-Directory and specify the main directory path to it. I have used Flow From DataFrame because it will help you fetching images with absolute path.
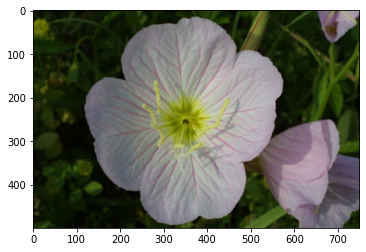
First, let’s take a look at the image from the training data set. The below code lists absolute paths of images available in the training dataset.
#lists dirs for train folder
label_1 = "flower_data/flower_data/train/1"
dirs_label_1 =  os.listdir(label_1)
Then, we create a function that can fetch us a single image of any image absolute path.
#visualise a flower
def get_image(path):
    flower = imageio.imread(path)
print(flower.shape)
plt.figure(figsize=(5,5))
    plt.imshow(flower)
Now to fetch the image, we need to concatenate the folder path with the image name and then pass it to the get_image function.
img = \'image_06736.jpg\'
label_path = label_1+\'/\'+img
label_path
Here’s how the path will look.
\'flower_data/flower_data/train/1/image_06736.jpg\'
Extract Image:
get_image(label_path)
Output Image:
Dataset also contains a .jason file from where you can get the dictionary of flowers and index. Just copy paste and create a Dictionary.
Remember that we are going to use only 20 of them, let’s select the first 20.
#select first 10
few_flowers = {}
for i in range(1,11):
    few_flowers[str(i)]=flower_names[str(i)]
few_flowers
To store the image abs path and labels, we create a function that will first create an empty data frame with absolute pathnames and image labels columns. And then populates it.
To get train data, specify the path. The path should look like this.
path = "flower_data/flower_data/train"
num_folders = 10
The number of subfolders is 10 because we want only 10 of the labels. If you want to build with a complete dataset then use flower_names as a dictionary and 102 as num_folders.
We have train and valid sets:
train = getdata(folder_path=path,num_subfolders=num_folders)
valid = getdata(folder_path=valid_path,num_subfolders=num_folders)
Visualize Images
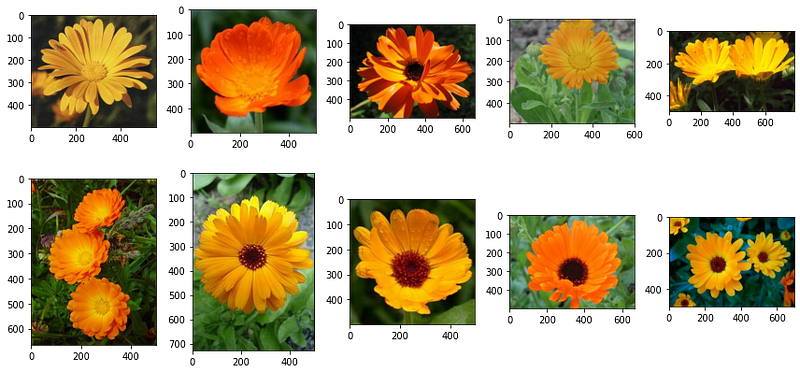
To get n number of images from the data frame we have created and visualize it.
get_n_images(10,train,"english marigold")
Outputs:
Images are having different sizes which we need to take care of during building the Image Generator.
Let’s check the proportion of flowers available to us.
The above function takes in a data frame and a dictionary of flowers to build the horizontal bar graph.
plotHbar(train,few_flowers)
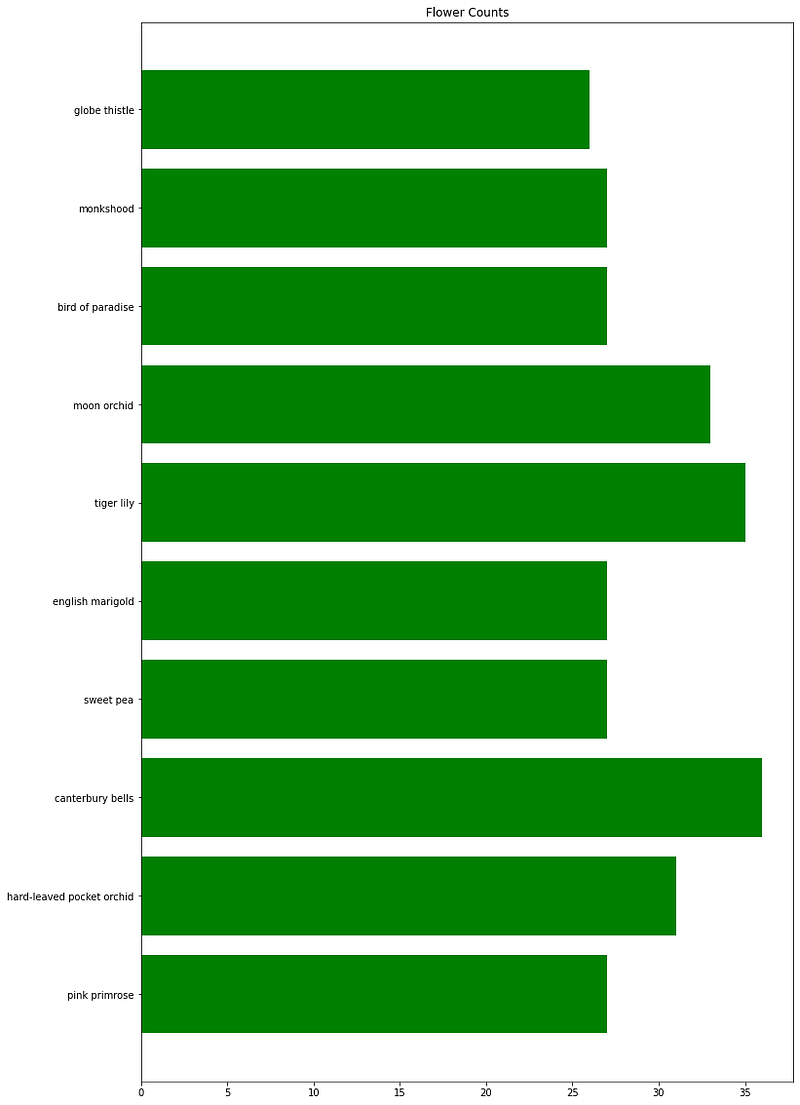
It seems the proportion of the labels are almost the same. Train data is not highly skewed and can be used without any sampling techniques.
Valid Set:
plotHbar(valid,few_flowers)
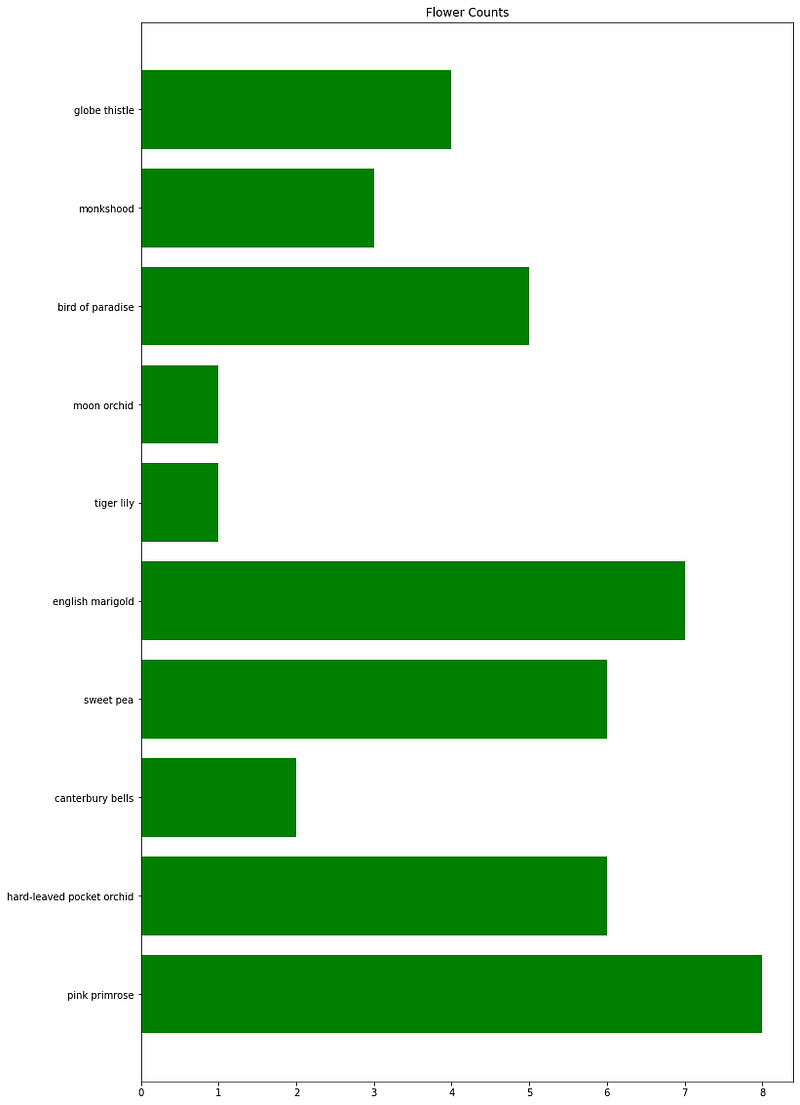
The valid set will be used for validation and not training, proportion doesn’t matter here. The model will train on the train set get experienced over it and then evaluate on the basis of the validation set.
Data Preprocessing
In this section, we will define a function that can take data frame and batch size as input and build the Image Data Generator through the flow_from_dataframe method. Image Generator takes in different parameters and on the basis of that it generates Images.
Parameters are rescaling, flips, rotations, shear range, etc. Check Keras Image Data Generator documentation for more details.
We will use ImageDataGenerator.flow_from_dataframe() for our purpose. It will take some parameters like:
x_col="filename"    #independent variable
y_col="class"       #dependent/target variable
target_size=(150, 150)    #Normalise the size
color_mode="rgb"          #Color Mode to red green blue
class_mode="categorical"  #Multiclass classification
batch_size=1              #Images to fetch from each folder
shuffle=True              # Shuffle images in the dataframe
Also, set the rescaling in ImageDataGenerator to normalize values.
Generate sets:
train_generated = datapreprocessing(train,bsize=1)
valid_generated = datapreprocessing(valid,bsize=1)
The below code visualizes the images generated by Generator.
Classifier Model
Our model will have 10 layers i.e. 4 Conv2D each followed by MaxPooling2D and 2 Fully Connected Dense Layers. You can check the parameters required by Conv2D and Dense layer in the documentation.
We will build the model with:
Model: "sequential_2"
_________________________________________________________________
Layer (type)                 Output Shape              Param #
=================================================================
layer1 (Conv2D)              (None, 75, 75, 16)        1744
_________________________________________________________________
max_pooling2d (MaxPooling2D) (None, 37, 37, 16)        0
_________________________________________________________________
layer2 (Conv2D)              (None, 37, 37, 32)        4640
_________________________________________________________________
max_pooling2d_1 (MaxPooling2 (None, 18, 18, 32)        0
_________________________________________________________________
layer3 (Conv2D)              (None, 18, 18, 64)        18496
_________________________________________________________________
max_pooling2d_2 (MaxPooling2 (None, 9, 9, 64)          0
_________________________________________________________________
layer4 (Conv2D)              (None, 9, 9, 64)          36928
_________________________________________________________________
max_pooling2d_3 (MaxPooling2 (None, 4, 4, 64)          0
_________________________________________________________________
flatten_2 (Flatten)          (None, 1024)              0
_________________________________________________________________
layer5 (Dense)               (None, 128)               131200
_________________________________________________________________
output (Dense)               (None, 10)                1290
=================================================================
Total params: 194,298
Trainable params: 194,298
Non-trainable params: 0
_________________________________________________________________
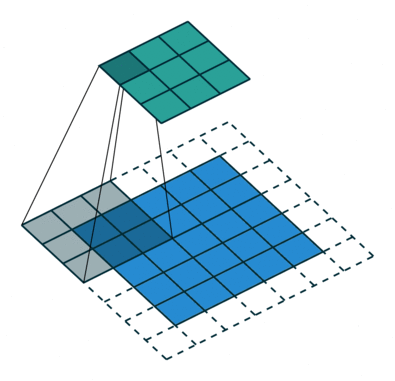
Kernel size and Strides for layers are given in the code for the model architecture below. Padding is ‘same’ throughout the Conv layers. Strides indicate the steps of conversion during filtering and Padding is the padded area to be considered or not.
Stride Visualisation:
Let’s build the classifier.
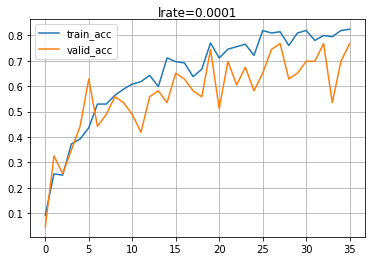
To compile the model, use Adam as Optimiser with learning_rate = 0.0001, loss = categorical_crossentropy, and accuracy as metrics. I have used Callbacks to save computing time but it is optional and depends on your rig. The function will return compiled model and history associated with it. It will also plot the accuracy curves.
Model Fit & Evaluation
Model is built using the build function described above and compiled through compileModel. The input shape of the data is (150,150,3) representing height, width, and channel. The model is being evaluated on the validation set.
model = imageclf2(input_shape=input_shape)
model_compiled = compiler2(model02,train_generated,
                           valid_generated,50,32)
Save your model.
# save the model to disk
model = model_compiled[0]
model.save(\'saved_models/flowerModel\')
Endnote.
I have used Keras Auto Tuner to find the best hyperparameters. You can refer to Auto Tuner for details.
Notebook Link: https://cainvas.ai-tech.systems/use-cases/flower-detection/
Credit: Rishi Rajak
Also Read: Flower Classification using CNN