Using a ConvNet built from scratch to automate detection of vehicle damage

Automobiles have become an integral part of the 21st century and every day there’s more cars out on the roads than there were yesterday. This inevitably comes with its own risks and the negligence of some drivers can cause minor to severe damage to property and the health of other people on the roads.
According to the World Health Organization, every year the lives of approximately 1.3 million people are cut short as a result of a road traffic crash. Between 20 and 50 million more people suffer non-fatal injuries, with many incurring a disability as a result of their injury.
As far as the economic damage goes road traffic crashes cost most countries 3% of their gross domestic product. However what could be a saving grace in these situations is a faster response time by paramedics and emergency workers.
With the recent advancements in Deep Learning, new applications of object detection in image processing are emerging in multiple domains.
One such novel application of image analysis is detecting external damages on vehicles, which can then be combined with an object detection framework to detect damages in real-time. Once detected an IoT device could be used to dispense an emergency call to alert nearby services.
In this article, we will be classifying the damaged vehicles into damaged or intact vehicles as a prospect to showcase future applications of the model.
Dataset
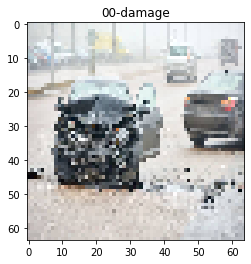
The dataset consists of images of cars taken from various different scenes ranging from in real life images to images of cars taken from the internet or news channels.
The images have been labelled as “01-whole” indicating an intact vehicle and “00-damage” indicating a damaged vehicle each consisting of 920 images.
Requirements
- Numpy
- Pandas
- Scikit-image
- Matplotlib
- Tensorflow
- Keras
- Cainvas Notebook Server
Here’s How it Works
- Our input is a training dataset that consists of N images, each labeled with one of 2 different classes.
- Then, we use this training set to train a ConvNet to learn what each of the classes looks like.
- In the end, we evaluate the quality of the classifier by asking it to predict labels for a new set of images that it has never seen before. We will then compare the true labels of these images to the ones predicted by the classifier.
- The model and its weights are then saved for future uses.
We’ll be using the Cainvas platform which provides us with powerful resources over the cloud to deliver robust models which are also available for future deployment on EDGE devices.
Code
Let’s get started with the code.
We’ll be using matplotlib to plot the images and the labels. Tensorflow and Keras are one of the most commonly used deep learning frameworks and we’ll be using them to create our ConvNet and engineer our model.
We have two directories train and validation each with 2 folders corresponding to the labels of our images. We will use the ImageDataGenerator by Keras to prepare the data and get appropriate labels pertaining to the folder structure. The generator also provides us the flexibility of creating train and validation split sets from the given dataset.
I defined checkpoints specifying when to save the model and implemented early stopping to make the training process more efficient.
Our model structure consists of four Conv2D layers including the input layer with a 2×2 MaxPool2D pooling layer each followed by a dense layer of 64 neurons with a ReLU activation function and the last layer with 2 neurons and the softmax activation function for making our class predictions.
I have used Adam as the optimizer as it was giving much better results. I have used categorical cross-entropy as the loss function for our model.
I trained the model for 100 iterations. However, you’re free to use a number of different parameters to your liking as long as the accuracy of the predictions doesn’t suffer.
This is the model architecture.
Model: "sequential"
_________________________________________________________________
Layer (type)                 Output Shape              Param #
=================================================================
conv2d (Conv2D)              (None, 62, 62, 32)        896
_________________________________________________________________
max_pooling2d (MaxPooling2D) (None, 31, 31, 32)        0
_________________________________________________________________
dropout (Dropout)            (None, 31, 31, 32)        0
_________________________________________________________________
conv2d_1 (Conv2D)            (None, 29, 29, 32)        9248
_________________________________________________________________
max_pooling2d_1 (MaxPooling2 (None, 14, 14, 32)        0
_________________________________________________________________
dropout_1 (Dropout)          (None, 14, 14, 32)        0
_________________________________________________________________
conv2d_2 (Conv2D)            (None, 12, 12, 32)        9248
_________________________________________________________________
max_pooling2d_2 (MaxPooling2 (None, 6, 6, 32)          0
_________________________________________________________________
dropout_2 (Dropout)          (None, 6, 6, 32)          0
_________________________________________________________________
conv2d_3 (Conv2D)            (None, 4, 4, 32)          9248
_________________________________________________________________
max_pooling2d_3 (MaxPooling2 (None, 2, 2, 32)          0
_________________________________________________________________
dropout_3 (Dropout)          (None, 2, 2, 32)          0
_________________________________________________________________
flatten (Flatten)            (None, 128)               0
_________________________________________________________________
dense (Dense)                (None, 64)                8256
_________________________________________________________________
dropout_4 (Dropout)          (None, 64)                0
_________________________________________________________________
dense_1 (Dense)              (None, 2)                 130
=================================================================
Total params: 37,026
Trainable params: 37,026
Non-trainable params: 0
_________________________________________________________________
This is a function to plot loss and accuracy which we will get after training the model. The model was saved and the results were plotted using the defined function.
Results
Loss/Accuracy vs Epoch
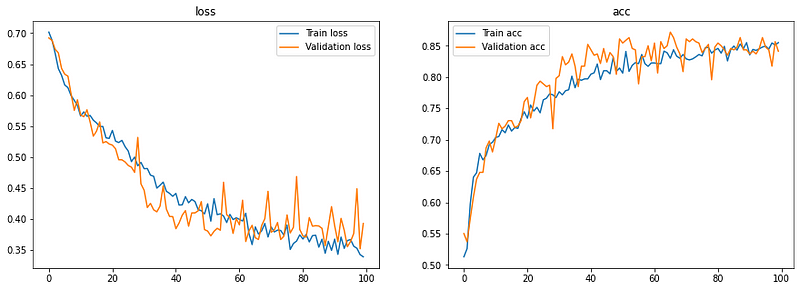
The model reached a validation accuracy of 87.174% which is decent.
Epoch 00065: val_accuracy did not improve from 0.86304
58/58 [==============================] - 8s 146ms/step - loss: 0.3591 - accuracy: 0.8387 - val_loss: 0.3900 - val_accuracy: 0.8500
Epoch 66/100
58/58 [==============================] - ETA: 0s - loss: 0.3876 - accuracy: 0.8301
Epoch 00066: val_accuracy improved from 0.86304 to 0.87174, saving model to ./base.model
INFO:tensorflow:Assets written to: ./base.model/assets
58/58 [==============================] - 10s 164ms/step - loss: 0.3876 - accuracy: 0.8301 - val_loss: 0.3700 - val_accuracy: 0.8717
Epoch 67/100
58/58 [==============================] - ETA: 0s - loss: 0.3760 - accuracy: 0.8436
Epoch 00067: val_accuracy did not improve from 0.87174
58/58 [==============================] - 8s 145ms/step - loss: 0.3760 - accuracy: 0.8436 - val_loss: 0.3672 - val_accuracy: 0.8630
Predictions
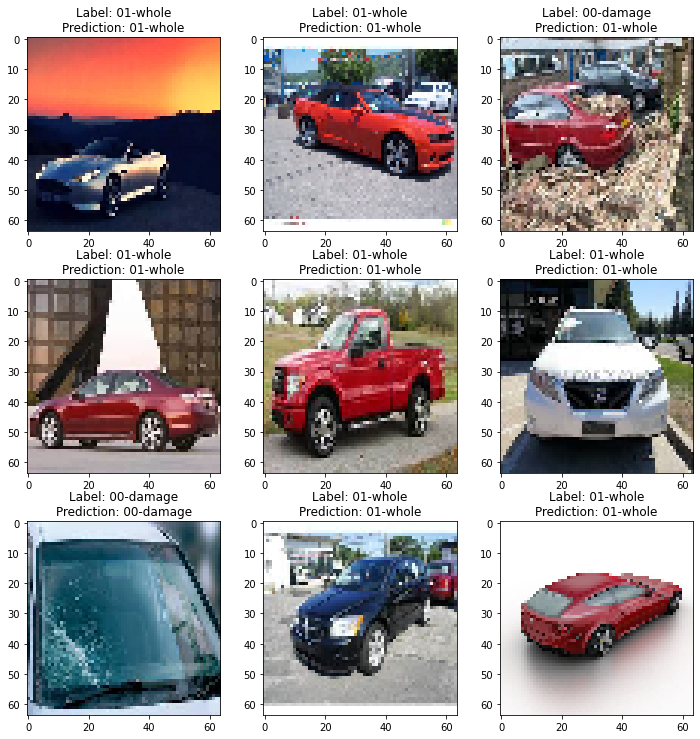
I took a batch of 16 images from the test images and plotted any 9 of them with the corresponding true and predicted labels after making the predictions using the model.
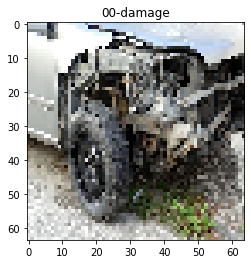
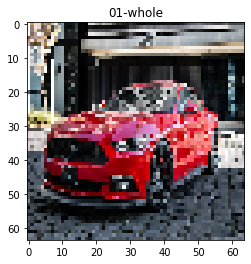
Here I defined a function which makes predictions on a custom image which the user can provide. It takes the image path as a parameter and renders the image with the predicted label once the prediction has been made by the model.
Here’s some of the predictions made by the model
Conclusion
In this article, I’ve demonstrated how a ConvNet built from scratch can be used to automate detection of damaged vehicles. This simple use-case can be used as a module for larger use-cases in object detection and applications in embedded devices.
Notebook Link: Here
Credit: Ved Prakash Dubey