Let’s build a classifier for classifying Insects e.g. Butterfly, Dragonfly, Mosquito, Grasshopper, and Ladybug using Keras Tensorflow Module.
Here are the steps we will follow:
- Data Import
- Visualizing Images
- Building Image Generators
- Model Architecture
- Prediction
About Dataset:
The dataset contains images of insects from different websites and there are 5 directories in this dataset for different kinds of insects. Each directory contains almost ~1000 images of the particular insect type. Data has been scraped from Google and iStock.
Data Import
We will start by importing the required libraries and the main directory path.
import tensorflow as tf
import cv2
import numpy as np # linear algebra
import pandas as pd # data processing, CSV file I/O (e.g. pd.read_csv)
import matplotlib.pyplot as plt
import os
Here’s the path to the main directory. In your case choose the path directed to your notebook. I have chosen ‘insects’ as my directory because that is the folder directed to my notebook. I have also created a variable representing the number of subfolders available (5 folders for 5 classes).
# Directory where images are present
main_dir = \'insects\'
num_fldrs = 5
Let’s create a dictionary that contains labels for each class and keys for them. Later it will be used to fetch class names.
# dictionary of labels
insect_names = {\'1\':"Butterfly",\'2\':"Dragonfly",
               \'3\':"Grasshopper",\'4\':"Ladybird",
               \'5\':"Mosquito"}
Now, we will build a data frame that contains an absolute path to each image and its label.
train = getdata(main_dir,num_fldrs)
The above function will return a data frame for main directory images.
Visualizing Images
Let’s create functions to visualize images. For example to fetch n number of images of Dragonfly from dataframe. Just to know if they are of the same size or not.
# A function to fetch single images based on path given
def get_image(path):
    img = cv2.imread(path,0)
    plt.imshow(img,cmap=\'gray\')
The output will look like this:
get_n_images(10,train,"Dragonfly")
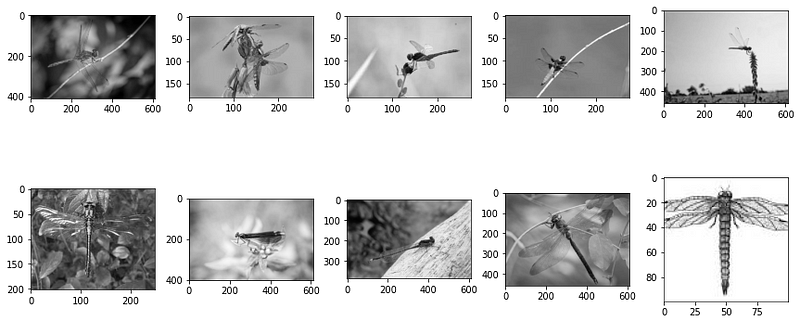
Images are not of the same size we will take care of that in Image Generator. The proportion of insects available in the data set is given below.
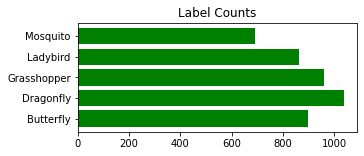
Image Data Generator
It generates batches of tensor image data with real-time data augmentation. There several parameters to pass in according to your need. Please check the documentation presented here.
Now, we will build our Image Data Generator which will be used to generate train and valid tests directly from the main directory by using Flow From Directory. We will also apply some image augmentation to our generator. Rotation range of 40 degrees — rotates images randomly, set Horizontal flip to be True and fill mode to be nearest.
After initializing the generator, we will set the target size of each image to be 150×150 (WxH). Each image is required in color so we will set the color mode to be ‘rgb’. Batch size is the number of extractions from each subfolder. We will do this for both sets i.e. train and valid.
# Build train and validation sets
traingen,validgen = datapreprocessing(main_dir,20)
Output:
Found 3116 images belonging to 5 classes.
Found 1333 images belonging to 5 classes.
Let’s look at what is happening inside the generator.
visualize_gen(traingen)
Output:
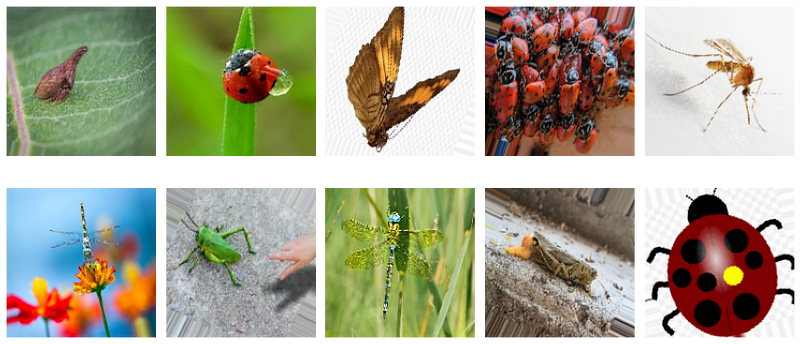
We have dealt with the size problem of the images. Images have also been augmented using rotation and horizontal flip.
Now we have our data set fully prepared. Let’s build the model.
Model Architecture
We will build our model as per the below summary.
Model: "sequential"
_________________________________________________________________
Layer (type)                 Output Shape              Param #
=================================================================
layer1 (Conv2D)              (None, 148, 148, 16)      448
_________________________________________________________________
max_pooling2d (MaxPooling2D) (None, 37, 37, 16)        0
_________________________________________________________________
dropout (Dropout)            (None, 37, 37, 16)        0
_________________________________________________________________
layer2 (Conv2D)              (None, 35, 35, 32)        4640
_________________________________________________________________
max_pooling2d_1 (MaxPooling2 (None, 17, 17, 32)        0
_________________________________________________________________
dropout_1 (Dropout)          (None, 17, 17, 32)        0
_________________________________________________________________
layer3 (Conv2D)              (None, 15, 15, 64)        18496
_________________________________________________________________
max_pooling2d_2 (MaxPooling2 (None, 7, 7, 64)          0
_________________________________________________________________
dropout_2 (Dropout)          (None, 7, 7, 64)          0
_________________________________________________________________
layer4 (Conv2D)              (None, 5, 5, 128)         73856
_________________________________________________________________
max_pooling2d_3 (MaxPooling2 (None, 2, 2, 128)         0
_________________________________________________________________
dropout_3 (Dropout)          (None, 2, 2, 128)         0
_________________________________________________________________
flatten (Flatten)            (None, 512)               0
_________________________________________________________________
layer7 (Dense)               (None, 128)               65664
_________________________________________________________________
dropout_4 (Dropout)          (None, 128)               0
_________________________________________________________________
layer8 (Dense)               (None, 128)               16512
_________________________________________________________________
dropout_5 (Dropout)          (None, 128)               0
_________________________________________________________________
output (Dense)               (None, 5)                 645
=================================================================
Total params: 180,261
Trainable params: 180,261
Non-trainable params: 0
To understand any of the above-mentioned layers, you can refer here.
We will proceed to our architecture by defining a builder function.
Build a model with the input_shape as the shape of the images.
# Get input shape
input_shape = traingen.image_shape
#Build Model
model01 = insectclf(input_shape)
Compile
To compile everything we will use :
loss = categorical_crossentropy
optimizer = Adam
metrics = accuracy
callback = Earlystopping
Here’s the full code
Let’s fit the model with epoch = 100, batch size = 32, and learning rate = 0.001. I have reached to these parameters after a lot of iterations but you are free to choose whatever you find fit.
model01 = compiler(model01,traingen,validgen,100,bsize=32,lr=0.001)
After running for 100 Epochs model will plot a curve and restore the best weights available.

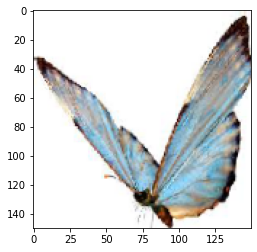
Get Prediction
Let’s try to predict any image available in the validation data set.
Pass in n any number between 0–19 because there 20 images from each folder.
get_predictions(13)
Output:
\'Butterfly\'
Save the model for later use.
model01[0].save(filepath=\'Dataset/saved_models/Model01.tf\',save_format="tf")
Congrats! you have built your first insect classifier model using Keras TensorFlow.
Thank you for reading my story.
Notebook link: here.
Credit: Rishi Rajak
Also Read: Shape Images Classification Using NN